Accessing your Raspberry Pi remotely through SSH over the internet has become an essential skill for many tech enthusiasts, hobbyists, and professionals alike. Whether you're managing a home server, running IoT projects, or simply want to control your Raspberry Pi from anywhere, understanding how to set up SSH securely is crucial. However, with great power comes great responsibility, and ensuring your Raspberry Pi remains protected from potential cyber threats is paramount.
SSH, or Secure Shell, is a cryptographic network protocol that allows users to securely access and manage remote systems. It provides an encrypted connection between your computer and the Raspberry Pi, enabling you to execute commands, transfer files, and perform various administrative tasks. This article will guide you step-by-step through the process of setting up SSH on your Raspberry Pi and accessing it over the internet safely.
As more people embrace remote work and IoT technologies, the ability to access Raspberry Pi devices remotely has become increasingly important. However, with this convenience comes the need for robust security measures. This guide will cover everything you need to know, from configuring SSH on your Raspberry Pi to implementing best practices for securing your connection. Let's dive in!
Read also:Chase Bank Computers Down A Comprehensive Analysis Of The Incident
Why Use SSH for Raspberry Pi Remote Access?
SSH offers several advantages when it comes to remote access for your Raspberry Pi. First and foremost, it provides a secure and encrypted connection, safeguarding your data from eavesdropping and unauthorized access. Additionally, SSH supports various authentication methods, such as passwords and public key authentication, allowing you to choose the level of security that suits your needs.
Using SSH also enables you to automate tasks, manage files, and execute commands remotely, making it an invaluable tool for system administrators and hobbyists alike. By setting up SSH on your Raspberry Pi, you can access your device from anywhere in the world, provided you have an internet connection.
Key Benefits of SSH for Raspberry Pi
- Encrypted and secure communication
- Supports multiple authentication methods
- Enables remote command execution and file management
- Facilitates automation of tasks
- Compatible with a wide range of operating systems
Setting Up SSH on Your Raspberry Pi
Before you can access your Raspberry Pi via SSH over the internet, you need to ensure that SSH is enabled on your device. By default, SSH is disabled on newer versions of Raspberry Pi OS for security reasons. Follow these steps to enable SSH on your Raspberry Pi:
Step 1: Enable SSH on Raspberry Pi
To enable SSH on your Raspberry Pi, you can use the Raspberry Pi Configuration tool. Open the terminal on your Raspberry Pi and type the following command:
sudo raspi-config
Once the configuration menu opens, navigate to "Interfacing Options" and select "SSH." Choose "Enable" to activate SSH on your Raspberry Pi. Alternatively, you can enable SSH by creating an empty file named "ssh" in the boot partition of your SD card before booting your Raspberry Pi for the first time.
Read also:Great American Family Channel Schedule Your Ultimate Guide To Familyfriendly Entertainment
Step 2: Find Your Raspberry Pi's IP Address
Once SSH is enabled, you need to find your Raspberry Pi's local IP address. In the terminal, type the following command:
hostname -I
This will display your Raspberry Pi's IP address, which you can use to connect to it from another device on the same network.
Connecting to Raspberry Pi via SSH Locally
Before attempting to access your Raspberry Pi over the internet, it's essential to test the local connection first. Use an SSH client, such as PuTTY on Windows or the built-in SSH client on macOS and Linux, to connect to your Raspberry Pi.
Step 1: Open Your SSH Client
On Windows, download and install PuTTY. On macOS and Linux, open the terminal. Enter the following command, replacing "192.168.x.x" with your Raspberry Pi's IP address:
ssh pi@192.168.x.x
Step 2: Authenticate the Connection
When prompted, enter your Raspberry Pi's password. By default, the username is "pi," and the password is "raspberry." It's highly recommended to change the default password for security reasons.
Accessing Raspberry Pi Over the Internet
Now that you've successfully connected to your Raspberry Pi locally, it's time to take it to the next level by accessing it over the internet. This process involves configuring your router, setting up port forwarding, and ensuring your Raspberry Pi is accessible from outside your local network.
Step 1: Configure Port Forwarding on Your Router
Port forwarding allows incoming traffic from the internet to reach your Raspberry Pi. Log in to your router's admin interface and locate the port forwarding settings. Create a new rule to forward port 22 (the default SSH port) to your Raspberry Pi's local IP address.
Step 2: Obtain Your Public IP Address
Your public IP address is the address assigned to your router by your Internet Service Provider (ISP). You can find your public IP address by visiting websites like whatismyip.com or ipchicken.com. Keep in mind that your public IP address may change periodically unless you have a static IP address.
Step 3: Test the Remote Connection
Using your SSH client, connect to your Raspberry Pi using your public IP address. Replace "your_public_ip" with your actual public IP address:
ssh pi@your_public_ip
Securing Your SSH Connection
While SSH is inherently secure, there are additional steps you can take to further protect your Raspberry Pi from unauthorized access.
Change the Default SSH Port
Changing the default SSH port from 22 to a non-standard port can help deter automated attacks. Edit the SSH configuration file by running the following command:
sudo nano /etc/ssh/sshd_config
Locate the line that says "Port 22" and change it to a different port number, such as 2222. Save the file and restart the SSH service:
sudo service ssh restart
Disable Password Authentication
Password-based authentication can be vulnerable to brute-force attacks. To enhance security, disable password authentication and use public key authentication instead. In the SSH configuration file, locate the following lines and modify them as shown:
PasswordAuthentication no
PermitRootLogin no
Save the file and restart the SSH service.
Use a Firewall
Implementing a firewall can help restrict access to your Raspberry Pi. Use tools like UFW (Uncomplicated Firewall) to allow only necessary ports and deny all other incoming traffic. Install UFW with the following command:
sudo apt install ufw
Allow SSH traffic and enable the firewall:
sudo ufw allow 2222
sudo ufw enable
Dynamic DNS for Easier Access
Since your public IP address may change, using a Dynamic DNS (DDNS) service can simplify remote access. DDNS assigns a hostname to your public IP address, which updates automatically when your IP changes. Popular DDNS services include No-IP, DynDNS, and DuckDNS.
Setting Up DuckDNS
To set up DuckDNS, follow these steps:
- Create an account on duckdns.org
- Choose a domain name for your Raspberry Pi
- Install the DuckDNS client on your Raspberry Pi by running the following command:
- sudo apt install curl
- curl https://get.duckdns.org | bash
Best Practices for Remote SSH Access
Adopting best practices ensures the security and reliability of your remote SSH connection.
Regularly Update Your Raspberry Pi
Keeping your Raspberry Pi's operating system and software up to date is crucial for security. Use the following commands to update your system:
sudo apt update
sudo apt upgrade
Monitor SSH Logs
Regularly checking SSH logs can help you identify and respond to potential security threats. Use the following command to view SSH logs:
sudo tail -f /var/log/auth.log
Troubleshooting Common Issues
Encountering issues while setting up SSH for Raspberry Pi over the internet is not uncommon. Below are some common problems and their solutions.
Problem: Unable to Connect
Solution: Ensure that SSH is enabled on your Raspberry Pi, port forwarding is correctly configured, and your firewall settings allow SSH traffic.
Problem: Connection Timeout
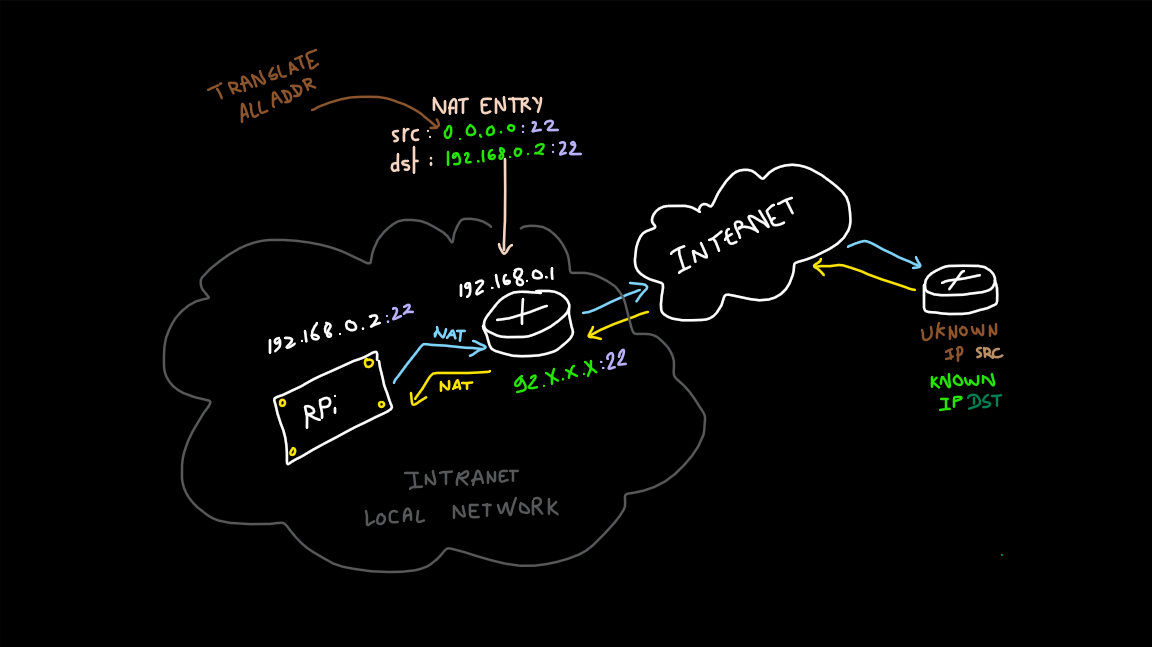
Solution: Verify your public IP address and ensure that your router's NAT settings are correctly configured.
Conclusion
In conclusion, accessing your Raspberry Pi via SSH over the internet is both powerful and practical, but it requires careful attention to security. By following the steps outlined in this guide, you can set up a secure and reliable SSH connection to your Raspberry Pi from anywhere in the world. Remember to regularly update your system, monitor logs, and implement best practices to ensure the safety of your device.
We encourage you to share your experiences, tips, and questions in the comments section below. Additionally, feel free to explore other articles on our site for more insightful content related to Raspberry Pi, IoT, and cybersecurity.
Table of Contents
- Why Use SSH for Raspberry Pi Remote Access?
- Setting Up SSH on Your Raspberry Pi
- Connecting to Raspberry Pi via SSH Locally
- Accessing Raspberry Pi Over the Internet
- Securing Your SSH Connection
- Dynamic DNS for Easier Access
- Best Practices for Remote SSH Access
- Troubleshooting Common Issues
- Conclusion